What's new

Andeep's 1999 Silvia Spec R "S15 FTW"

Joined
28 July 2009
Messages
563
Reaction score
0
Points
0
Location
Hertfordshire
To anyone who wants to do an ABS delete, here's a short guide.

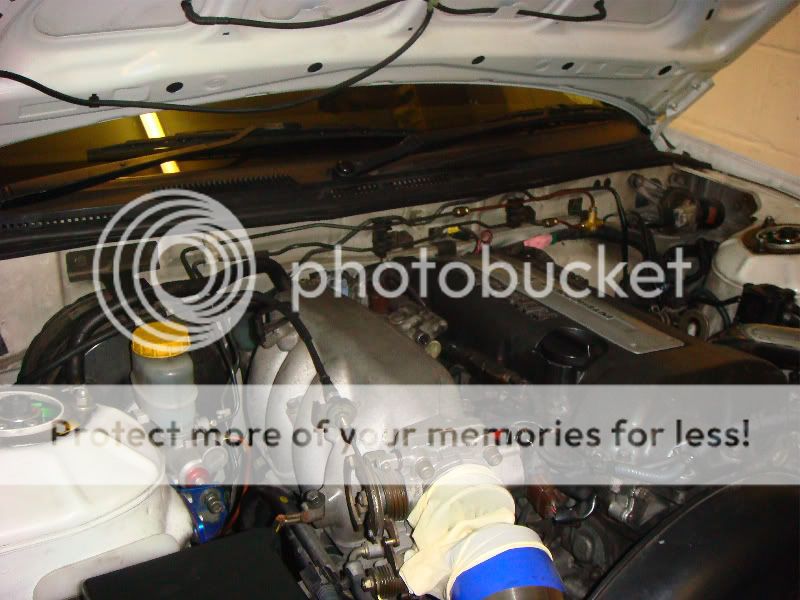
The master cylinder that is in the top left right of the engine bay with have two outputs on it; a front and a rear. Now with the original ABS, both the front and rear outputs of the master cylinder are routed behind and just to the top of the engine on the bulkhead and go to the ABS module at the rear left of the engine bay. Here the ABS takes the two front and rear inputs and then has 3 outputs; front right, front left, and rear. The front left just goes from the ABS directly to the wheel arch and into the caliper, but the front right and the rear go from the ABS module and again are attached to the bulkhead where the original ABS input lines run. This then makes 4 lines that run behind the engine across of the bulkhead.

Okay, that's how the stock ABS is routed. Now if you want to get rid of the ABS, there are some lines that you will need to run. You may be thinking that there are 4 calipers but only 2 outputs from the master cylinder.

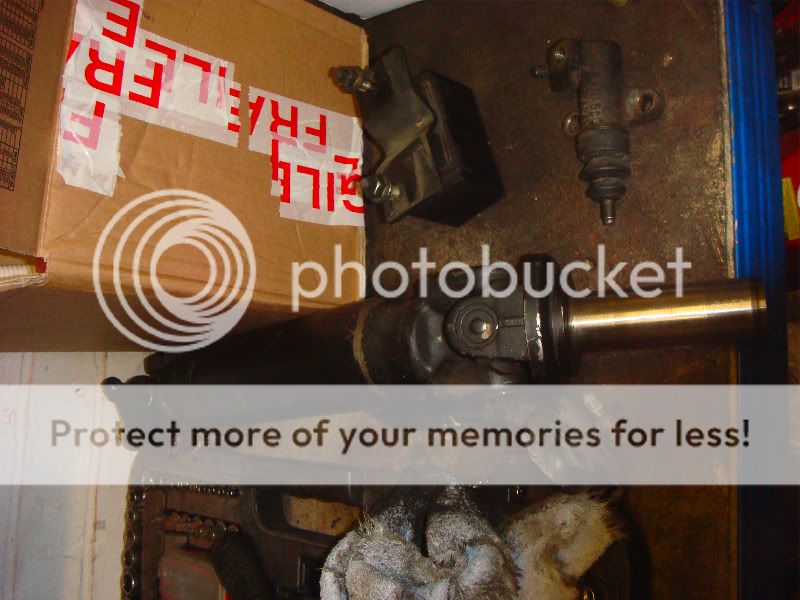
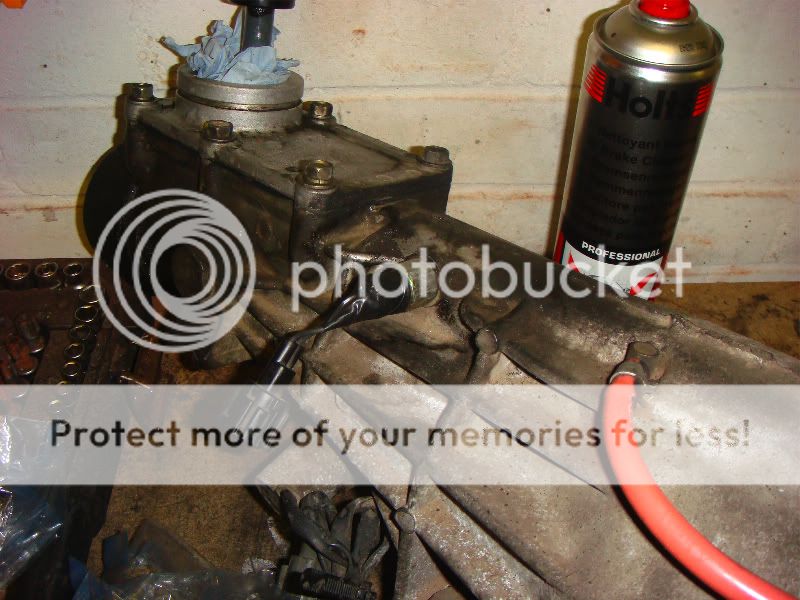
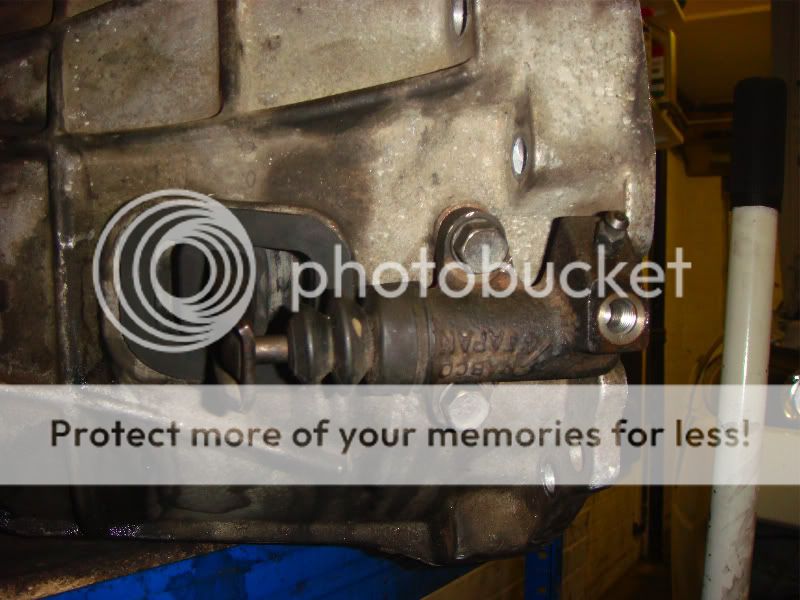
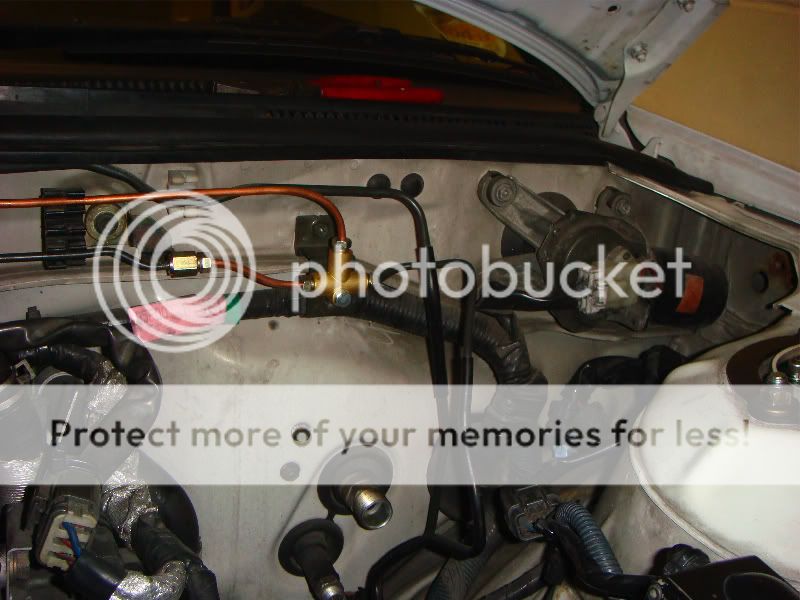
Well lets start on the rears, there is only a single brake line that runs down the car to the rear. At the back of the car there is a T-Piece that splits the rear brake line into 2 to serve the rear calipers. Now at the very start of the transmission tunnel there is a small block that is connected to this line that goes to the rear, you can just about see it in the photo below (where the copper line runs to):


So all you do is connect a line from the master cylinder into this block and that's the rears sorted. Either in that connector or the T-Piece at the rear there is a built in restrictor, so you don't need to worry about brake bias.

Now the next part is the fronts. Since there is only 1 front output from the master cylinder and 2 calipers, you have two choices. You can either get a non-abs brake master cylinder from a skyline or Z32 which will have 3 outputs (front right, front left, rear), or you can just put in a T-Piece and copy the rears.

Check a few posts above for the reasons why I have routed the lines like I have.

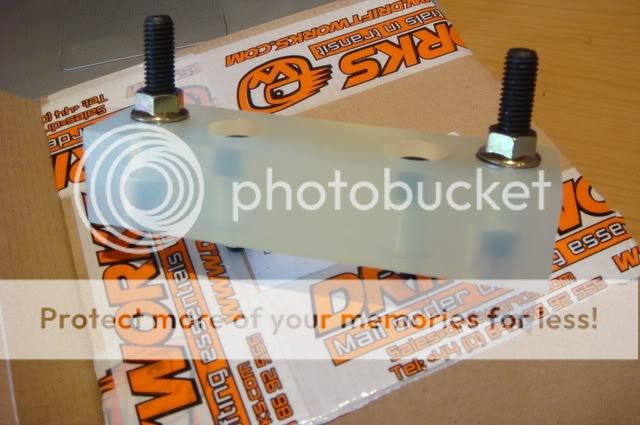
So you're gonna need a T-Piece, I got mine from Vehicle Wiring Products. You will need a one with 10mm x 1 fittings. So you will need to route a line from the BMC to the T-Piece, and then 2 lines from the T-Piece to each of the front calipers. Bare in mind that the T-Piece has concave connectors, so you will need a bubble flare and not a double flare to connect to it. All the other connection in the car like the BMC and the connector near the transmission tunnel will need normal double flares.

Here's a finished photo of the T-Piece showing the connections that go to the front calipers, the black piping goes to the front left and the copper on the opposite side goes back across the bulkhead to the front right caliper. The input at the top is from the BMC.


And finally this is how the BMC should look:


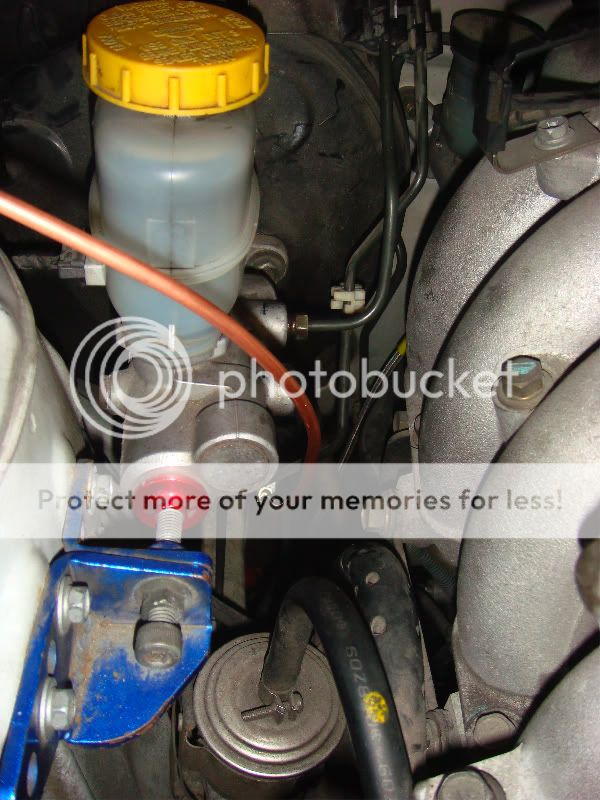
I haven't finished it just yet, but you can see that the rear port on the BMC goes has the black pipe that runs across the bulkhead to the T-Piece. You can see the connector for the rears, with a tubing that coming out of it going to the BMC's rear output that I need to finish off and connect.

Edit:
Also when I describe the left or right of the car, it's as if you're sitting in the car and not viewing it from the engine back. So when I say front right caliper, this is the drivers or offside one.
 
Last edited:

LuPix_S15

Banned Toyota Lover
Joined
14 April 2007
Messages
3,891
Reaction score
1
Points
0
Location
Shropshire, UK
Website
www.lupix.co.uk
Country
Nice1 Andeep - really useful as I'm gonna do this after I've upgraded my rear brake setup with the Skyline conversion (sliding-r has recently done this) :)


I think this should deffo be added to the useful threads section :thumbs:
 

craig8585

I'm so cool, I have my own fan thread :p
🔥 Contributing Member 🔥
Joined
16 November 2007
Messages
4,118
Reaction score
0
Points
0
Location
Lichfield, UK
Country
Thanks for the write-up Andeep, I'm sure it will be useful for some people. I'll link it to the useful threads. :)

Did you find much out regarding the electronic side of things related to the ABS?
 
Joined
28 July 2009
Messages
563
Reaction score
0
Points
0
Location
Hertfordshire
No problem guys!

Haven't found out any information about the electronics side of it, but I'm hoping that the speedo works okay with the ABS pump taken out. It still has the electronic control box in, so shouldn't be a problem.

What I really wanted to know is how I can use the S14 speedo from the gearbox with the car instead of it taking the reading from the ABS sensor in the diff. It would be great if its just a case of plug and play, but I'm not sure how I would ever find out. Reason is that I might want to be able to use a GTR diff casing and GTR driveshafts as they are a lot stronger than S15 ones.

If anyone has any information about the signals that come off the ABS sensor in the diff and the gearbox, let me know.
 
Last edited:
Joined
28 July 2009
Messages
563
Reaction score
0
Points
0
Location
Hertfordshire
ABS delete is finished, just need to fill and bleed the system and pray it doesn't leak!


Here's a photo of the engine bay to show how the brake hoses are routed:

 
Joined
28 July 2009
Messages
563
Reaction score
0
Points
0
Location
Hertfordshire
Made a bit more progress with the gearbox conversion today with just sorting out the little niggles and prepping the gearbox for installation.

ACT HD 6 Puk Paddle clutch:


Make sure you get a sprung pressure plate, if you don't you'll probably blow the gearbox up after 1 or 2 clutch kicks


Driftworks Lightened flywheel:


Box of random bits that you will need for the conversion:


The gearbox that I got was from an import SR20DET PS13 with only 50,000kms on it:


S14 Prop:


The S15 transmission loom uses different connectors to that S14 ones, so I swapped them over and soldered on the S15 connectors:


Inside of the bellhousing was full of clutch, so cleaned it all off:


All cleaned up and a Nismo Reinforced clutch pivot installed:


Cleaned up the clutch fork and the release bearing carrier:


Everything greased up and installed into the input shaft:


Dust cover installed and slave cylinder installed:

 
Last edited:
Joined
28 July 2009
Messages
563
Reaction score
0
Points
0
Location
Hertfordshire
Install the spigot bearing into the end of the crank (only do this if you are installing a 5-Speed transmission, with a 6-Speed it goes into the flywheel). Also make sure you put the metal plate on before you put the flywheel on:


Install the flywheel and torque the bolts, I used a screwdriver to jam the flywheel still while I torqued it:


Make sure you clean the flywheel with brake cleaner as it has a film on it to protect it before installation. Use the alignment tool to install it:


Install the pressure plate and torque the bolts. I used a spanner to hold one of the pressure plate bolts while I torqued the rest to hold it still.


craig8585

I'm so cool, I have my own fan thread :p
🔥 Contributing Member 🔥
Joined
16 November 2007
Messages
4,118
Reaction score
0
Points
0
Location
Lichfield, UK
Country
Good work mate. Are you doing this in your garage? I did my clutch on a 2 pillar ramp and it was difficult enough on there with a transmission jack! Howcome your tunnel's beaten in so badly?
 
Joined
28 July 2009
Messages
563
Reaction score
0
Points
0
Location
Hertfordshire
Cheers mate. Yep doing this at home on my back and it's a pain in the arse. The transmission tunnel had to be beat because the 6-Speed transmission would not go on last time I changed the clutch.
 

craig8585

I'm so cool, I have my own fan thread :p
🔥 Contributing Member 🔥
Joined
16 November 2007
Messages
4,118
Reaction score
0
Points
0
Location
Lichfield, UK
Country
I would not fancy doing what your doing! Fair play for doing it yourself though, it's by far the best way to learn but I bet you say 'never again' afterwards!! :)

The box will go on without 'modifying' the tunnel but you have to disconnect the intake + exhaust and remove strengthening bar infront of the engine to allow it to tilt backwards enough to get the box on. You may have to turn the box though 180degrees once the input shaft is located as the starter motor bracket can get in the way.
 
Joined
28 July 2009
Messages
563
Reaction score
0
Points
0
Location
Hertfordshire
Shouldn't be too bad really, doing it on a 6-speed is a lot harder last time!

Even with the engine mounts loosened and the front of the engine jacked up to tilt it back, the 6-speed would not go on because it kept hitting the transmission tunnel and beating it out was the only way to get it on.

A lot of the S14 boys have beaten out their transmission tunnels as it makes allows the gearbox to go on a lot more easily if you don't have a ramp. Also when I put in uprated engine mounts it will be near impossible to take the box off as there will be hardly any compliance in them to tilt the engine back, so the transmission tunnel will have to be modified.
 
Last edited:
Joined
28 July 2009
Messages
563
Reaction score
0
Points
0
Location
Hertfordshire
Wow its been a long day. Finally got the gearbox done which was a pain in the back side to do alone.

The problem is that there's not a lot of space when you've got the car on axle stands and you're on your back with a massive heavy gearbox next to you and how you're thinking "how the heck am I gonna lift it up into the car?!". If that wasn't difficult enough, the gearbox has to be 100% aligned or it won't go on. Then in some cases even once you've managed to get the input shaft into the spigot bearing, the spines on the input shaft have to be rotated while you wiggle the box on. It would have been a lot easier to have someone with you to help align and push the box.

I used a trolley jack on the front of the box and a ****ty halfords jack on the rear to lift it up and align it. I then used an old seatbelt suspended from the shifter hole with a bit of wood to hold the box once the rear jack was removed. When you push the box on you can feel it pop into the spigot bearing, then at this point I put it in gear and put the prop back on and turned that while wiggling the box and pushing it with my knees and feet. Eventually the box went on.

What a bitch of a job.

Then I had problems with my brake lines leaking, so had to make a few new lines and tighten the crap out of them to stop them from leaking.

Another few bits that I need to my conversion guide is that you need the 5-Speed gaiters as the 6-Speed ones don't fit. Also you need a 5-Speed shift knob as the thread is different, min is currently duck taped onto the shifter from stop me from pulling it off :wack:

Tbh I don't see all the fuss about problems with driving with a paddle clutch - feels pretty normal to me. Of course the bit is very strong and it suddenly clamps, but it's not hard at all to drive - I haven't stalled it yet :cool:

Also the brakes feel well pretty much the same, I can't notice much difference, but taking the ABS out when drifting will help a lot as the brakes seem to shut off when you spin out.

Also I really need to get my propshaft balanced, holy vibration batman when you're accelerating!

Anyway my arm feels like it's about to fall off and I can't type anymore! :down:
 

LuPix_S15

Banned Toyota Lover
Joined
14 April 2007
Messages
3,891
Reaction score
1
Points
0
Location
Shropshire, UK
Website
www.lupix.co.uk
Country
Fair friggin' play mate... you have just exemplified exactly why I will try most jobs except this one lol. Getting the engine block out seems easier!! :wack:


I too would have to jack the car up on axle stands and the missus would divorce me after I've been cursing 3 days non-stop and spending all my time on the box conversion. But total respect you stuck with it and did it yourself without anyone else helping!!! :thumbs:
 
Joined
28 July 2009
Messages
563
Reaction score
0
Points
0
Location
Hertfordshire
Cheers for the kind words mate.

I will post some pictures of the new gearbox on the car when I get some time.

Just bled my brakes again, gonna do a few more times to just to make sure there's no air in the system. At higher speeds the brake pedal feels a lot firmer and you can sort of tell when the wheels are gonna lock with no ABS.

The car feels really good now, I got rid of the stock clutch dampening loop and put in a braided line and the clutch feels great now, but it's a bit heavier due to the new clutch. When moving off with a paddle clutch is easy to do it slowly, but if you want to move off sort of sharpish its a bit more difficult as the car will either stall very easily, or spin its wheels. But I'm loving the new setup! Just need to run in the clutch for a little bit before I drift it.

Also you need to make a slight modification (very simple) to the underside of the plastic part that attaches around the shifter with the leather boot on it. You just need to trim some of the plastic because when you move the gearstick downwards, the shifter hits the trim. It's only the underside of the trim and you can't see this when it's all fitted. I will add these points to my guide soon.

Next time I'm just gonna take engine out to change the clutch, will take a bit longer but a lot easier to do alone!
 
Last edited:
Joined
28 July 2009
Messages
563
Reaction score
0
Points
0
Location
Hertfordshire
My Driftworks Poly Gearbox mount came today:


Will be fitting it soon and will let you guys know how it damages my spine! The mount is super hard!
 
Joined
13 November 2006
Messages
429
Reaction score
0
Points
0
Location
Swindon, UK
Fantastic work mate. I've got to swap my box over soon. Not looking forward to that. Are you going to do the engine mounts as well?
 

LuPix_S15

Banned Toyota Lover
Joined
14 April 2007
Messages
3,891
Reaction score
1
Points
0
Location
Shropshire, UK
Website
www.lupix.co.uk
Country
Yeah no worries mate - credit where it's due :)

I was going for the DW box mount but ended up getting the Hardrace one which Craig was selling off (we all know Craig and his special deals haha!!). It's probs about as harsh as the Apex one but not quite as harsh as the DW item. But it should make a nice difference to your setup - everything just that little bit tighter and louder for drifting fun etc :thumbs:
 
Joined
28 July 2009
Messages
563
Reaction score
0
Points
0
Location
Hertfordshire
Fantastic work mate. I've got to swap my box over soon. Not looking forward to that. Are you going to do the engine mounts as well?
You putting in a 5-Speed? I will do engine mounts soon, but not too sure which ones to go for. Might go for Nismo ones.

Yeah no worries mate - credit where it's due :)

I was going for the DW box mount but ended up getting the Hardrace one which Craig was selling off (we all know Craig and his special deals haha!!). It's probs about as harsh as the Apex one but not quite as harsh as the DW item. But it should make a nice difference to your setup - everything just that little bit tighter and louder for drifting fun etc :thumbs:
Only problem with this is that it doesn't have a mount for the exhaust hanger thing to bolt onto. Probably won't make too much of a difference, but I need to get a flexi downpipe. Also my downpipe is currently held on with one bolt as the studs kept breaking :down:
 
Joined
13 November 2006
Messages
429
Reaction score
0
Points
0
Location
Swindon, UK
You putting in a 5-Speed? I will do engine mounts soon, but not too sure which ones to go for. Might go for Nismo ones.
No. I've got a spare 6MT box to go on. In fact, I've got spare everything as I have a half stripped S15 in the garage :wack:
 
Top